How to Set Up a Gitlab CI/CD pipeline to deploy a Next.js App to Firebase
A definitive guide to setting up GitLab CI/CD pipeline for deploying a Next.js App to Firebase Hosting
This article is now deprecated in favour of Firebase App Hosting, which supports hosting Next.js Apps out of the box and is deeply integrated with Github.
Congratulations 🎉 on launching your new blog. Now that you have a basic blog set up using Next.js, let's automate our deployment process to enhance efficiency. Next.js Apps are commonly deployed to Vercel or Netlify. But, lets explore some alternatives. In this article, we will see how we can set up a CI/CD pipeline for our Next.js app using Gitlab Pipelines and deploy to Firebase App Hosting. This would apply to any other CI/CD pipelines such as Github Actions or Azure DevOps, as the trick remains the same.
- Free App hosting - Firebase offers free app hosting for static apps and websites, including support for Next.js as public beta.
- Free CDN - Firebase provides a free CDN (Content Delivery Network) that serves your static pages.
- Free SSL - All apps hosted on Firebase come with free SSL certificates that are installed and automatically renewed.
- Firebase has a generous free usage quota, just the right amount of Backend service needed for small personal blogs and documentation apps.
Prerequisites
If you do not have a Firebase project setup then I got you covered in next tutorial about how to setup Next.js apps on firebase. Once you have a Firebase project setup, you will need to create a Service Account to authenticate the CI/CD pipeline.
Previously, CI/CD pipelines used to authenticate Firebase using FIREBASE_TOKEN, however this has been deprecated and replaced with GOOGLE_APPLICATION_CREDENTIALS environment variable.
You might see this warning message when you run firebase deploy command if you are using FIREBASE_TOKEN.
⚠️Warning-Message
$ firebase deploy --token $FIREBASE_TOKEN
⚠  Authenticating with `--token` is deprecated and will be removed in a future major version of `firebase-tools`.
Instead, use a service account key with `GOOGLE_APPLICATION_CREDENTIALS`: https://cloud.google.com/docs/authentication/getting-started
In this article we will use using the latest recommended way to setup authentication for our GitLab pipelines.
Setting up Firebase Service Account
Let's start by creating a Service Account in Firebase, if you haven't already. Go to your Firebase project and click on Settings > Project Settings > Service accounts.
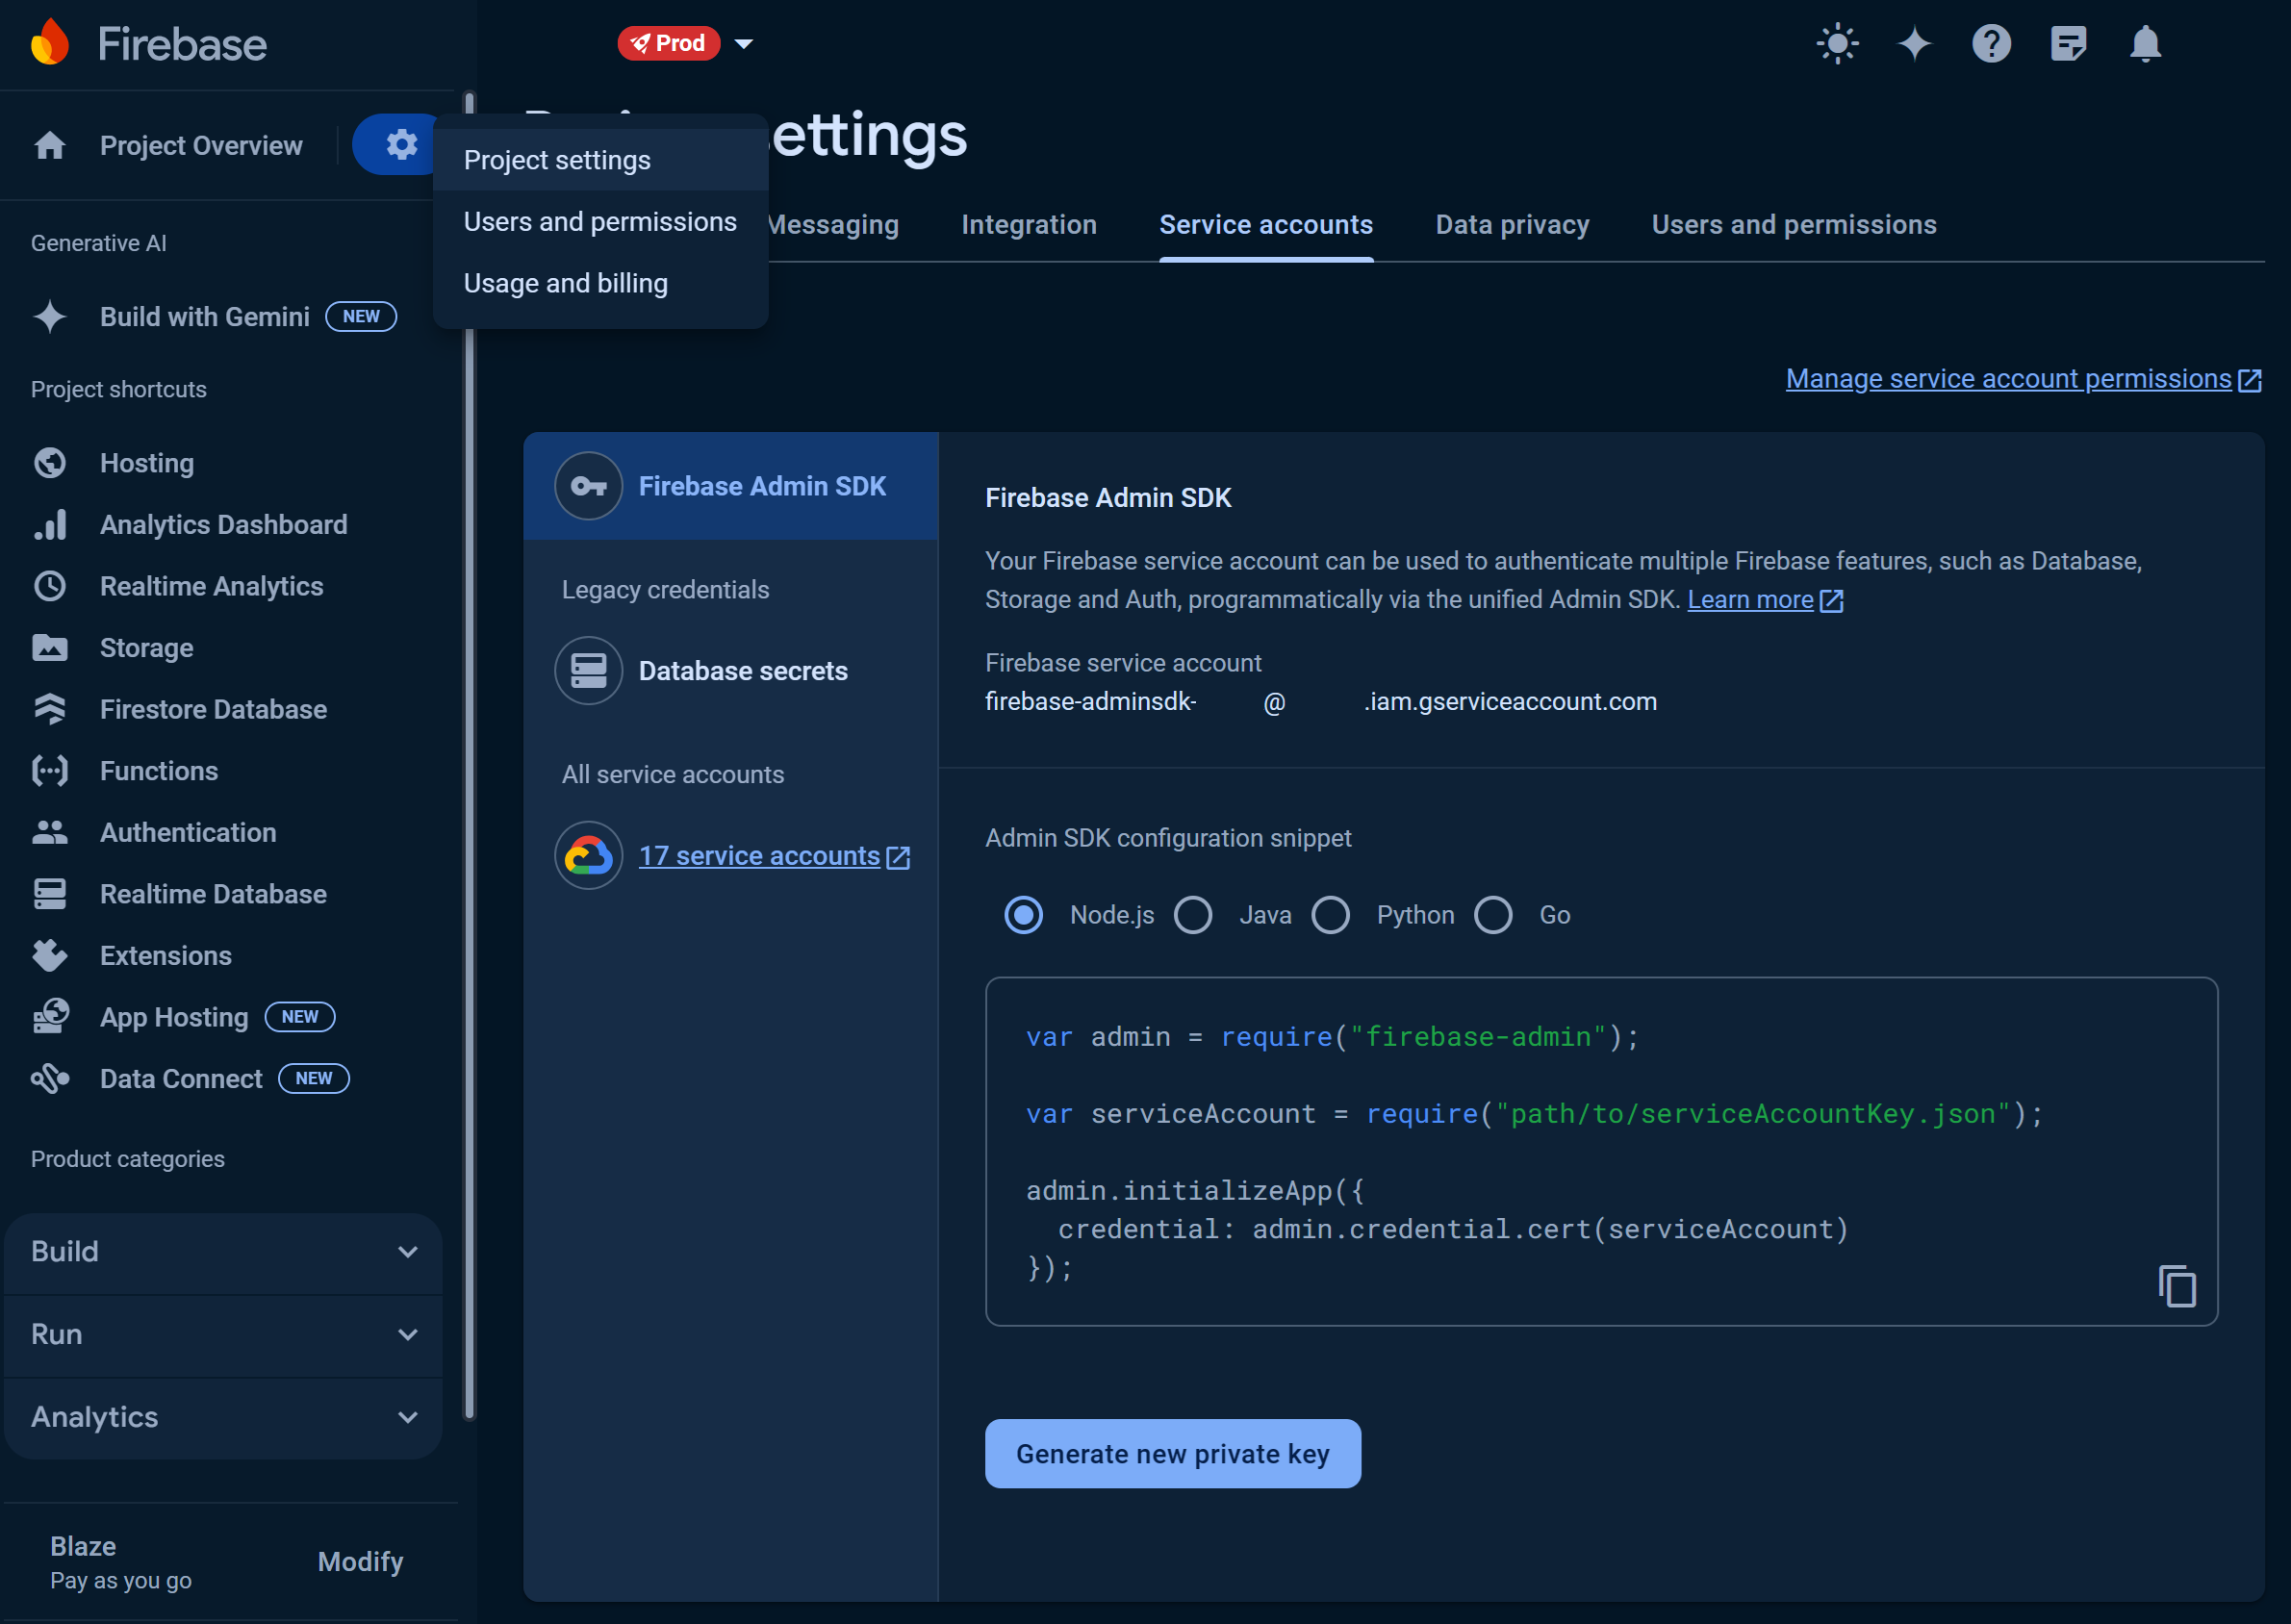
You should see your service account as firebase-adminsdk-xxxxxx@domain-com.iam.gserviceaccount.com.
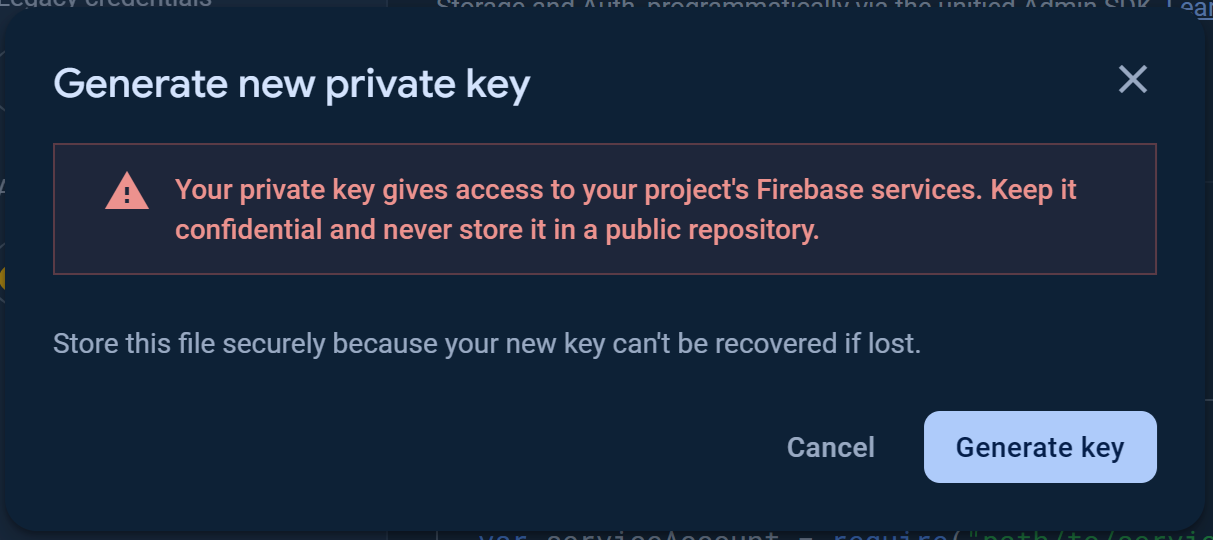
- Click on Generate new private key and download the JSON file and save it in a secured location.
- Rename the private key file to
firebase-adminsdk-private-key.jsonfor convenience. - You can skip the above two steps if you already have the private key JSON file.
Use GCP cloud Google Credentials to authenticate Gitlab Pipeline runners
Now we need to use the private key JSON file to authenticate our Gitlab Pipeline runners. To do that, we have to set the contents of the JSON file as a secret in Gitlab.
- Go to your Gitlab project and click on Settings > CI/CD > Variables.
- Click on Expand.
- Click on Add Variable and add the following details

- Keep the variable Type as
Variable - Set the Visibility flag as
Visible. - Set the Key name as
GOOGLE_APP_CRED - Set the Value as the contents of the JSON file as shown below: Gitlab Set GOOGLE_APPLICATION_CREDENTIAL CI/CD Environment Variable
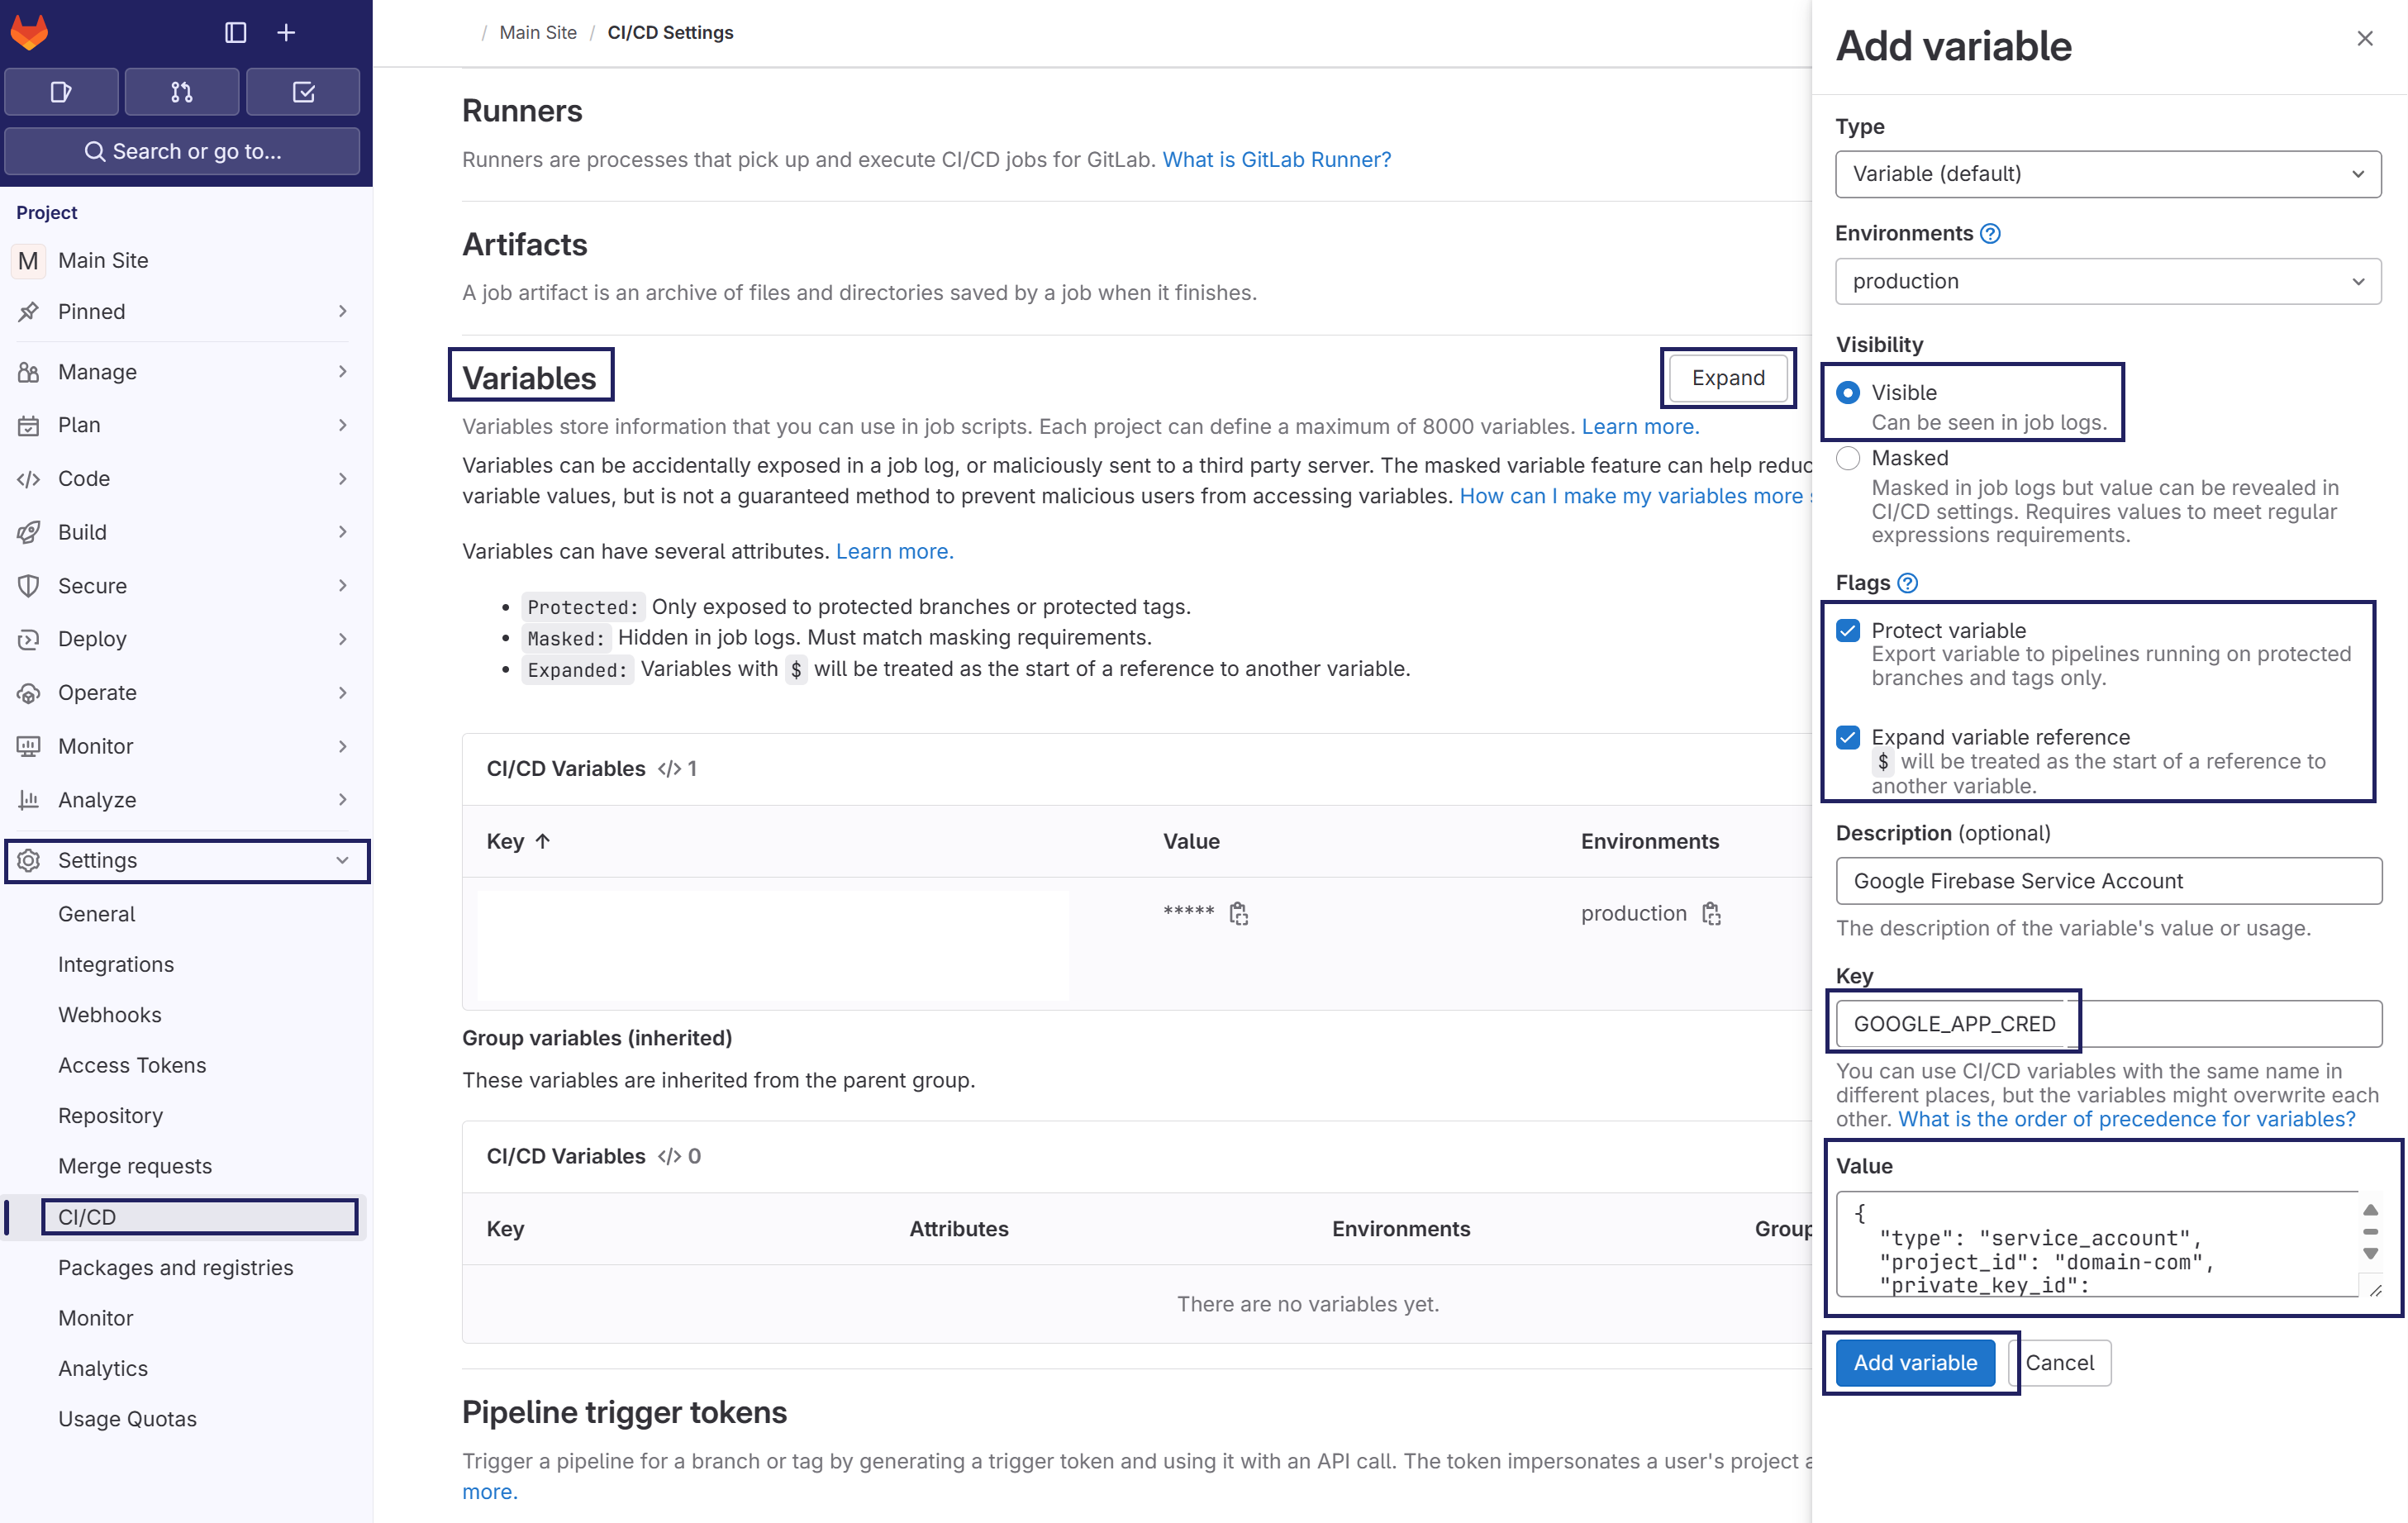
- Click on Add Variable button.
Unfortunately, the value of the variable cannot be masked because it contains the following characters: {, , ", ,, , , %, } and whitespace characters.
Setting up Gitlab CI/CD Pipeline file
Once the environment variables are set, we can now setup the Gitlab CI/CD Pipeline file.
Add the below contents to the .gitlab-ci.yml file in the root of your project.
.gitlab-ci.yml
image: node:20.12.2-buster # Use the latest LTS release of Node.js

stages: # List of stages for jobs, and their order of execution. Lets keep it simple for now
  - build-n-deploy

before_script:
  - npm i -g firebase-tools
  - firebase experiments:enable webframeworks # Enable the webframeworks experiment
  - echo $GOOGLE_APP_CRED > "$HOME/gccred.json"
  - export GOOGLE_APPLICATION_CREDENTIALS="$HOME/gccred.json"

after_script:
  - rm -rf $HOME/gccred.json

deploy-job: # This job runs in the deploy stage.
  stage: build-n-deploy
  environment: production
  script:
    - echo "Building My Awesome Blog"
    - npm install
    - echo "Deploying to Firebase"
    - firebase deploy
  only:
    refs:
      - main
Points to note in the above file
image: This is the docker image we will be using to build our project on. We are using latest Node.js LTS version here.before_script: This is where the magic happensnpm i -g firebase-tools: This installs thefirebase-toolsglobally.firebase experiments:enable webframeworks: This enables thewebframeworksexperimental feature. This is essential as of now because NextJS deployment in Firebase is still in experimental stage and we have to enable this settings globally before deploying. Else, you will get the following error:
3.Deployment FailedError: Cannot deploy a web framework from source because the experiment webframeworks is not enabled. To enable webframeworks run firebase experiments:enable webframeworks
echo $GOOGLE_APP_CRED > "$HOME/gccred.json":
This creates a file calledgccred.jsonin the home directory. 4.export GOOGLE_APPLICATION_CREDENTIALS="$HOME/gccred.json":
This exports theGOOGLE_APPLICATION_CREDENTIALSenvironment variable with our firebase-adminsdk credentials.deploy-job: This is the stage where we build and deploy the project to Firebase.after_script: Although, the Gitlab pipeline runners gets purged after each run, but for security reasons and peace-of-mind we remove thegccred.jsonfile from HOME directory.
Conclusion
With the above setup we are now ready to deploy our NextJS project to Firebase. The pipeline will automatically get triggered when you push any changes to main branch and will build & deploy the project to Firebase.
🛠️ Troubleshooting - HTTP Error: 403, Caller is missing permission
You might encounter the following error while deploying to Firebase:
functions: HTTP Error: 403, Caller is missing permission 'iam.serviceaccounts.actAs' on service account projects/-/serviceAccounts/460700000000-compute@developer.gserviceaccount.com. Grant the role 'roles/iam.serviceAccountUser' to the caller on the service account projects/-/serviceAccounts/460700000000-compute@developer.gserviceaccount.com.
You can do that by running
gcloud iam service-accounts add-iam-policy-binding projects/-/serviceAccounts/460700000000-compute@developer.gserviceaccount.com --member MEMBER --role roles/iam.serviceAccountUser
where MEMBER has a prefix like 'user:' or 'serviceAccount:'.Details and instructions for the Cloud Console can be found at https://cloud.google.com/functions/docs/reference/iam/roles#additional-configuration.
This is because the the firebase-adminsdk service account invokes a default compute service account to deploy firebase functions which are Google Cloud Functions under the hood, and this account does not have the roles/iam.serviceAccountUser role. To fix this issue, you can grant the roles/iam.serviceAccountUser role to the default compute service account by doing the following steps:
- Open the Cloud Console and navigate to the IAM & Admin page.
- Click on the
Service Accountstab. - Click on actions button on
460700000000-compute@developer.gserviceaccount.comaccount row. - Click on "Manage Permission". GCP IAM Service Accounts
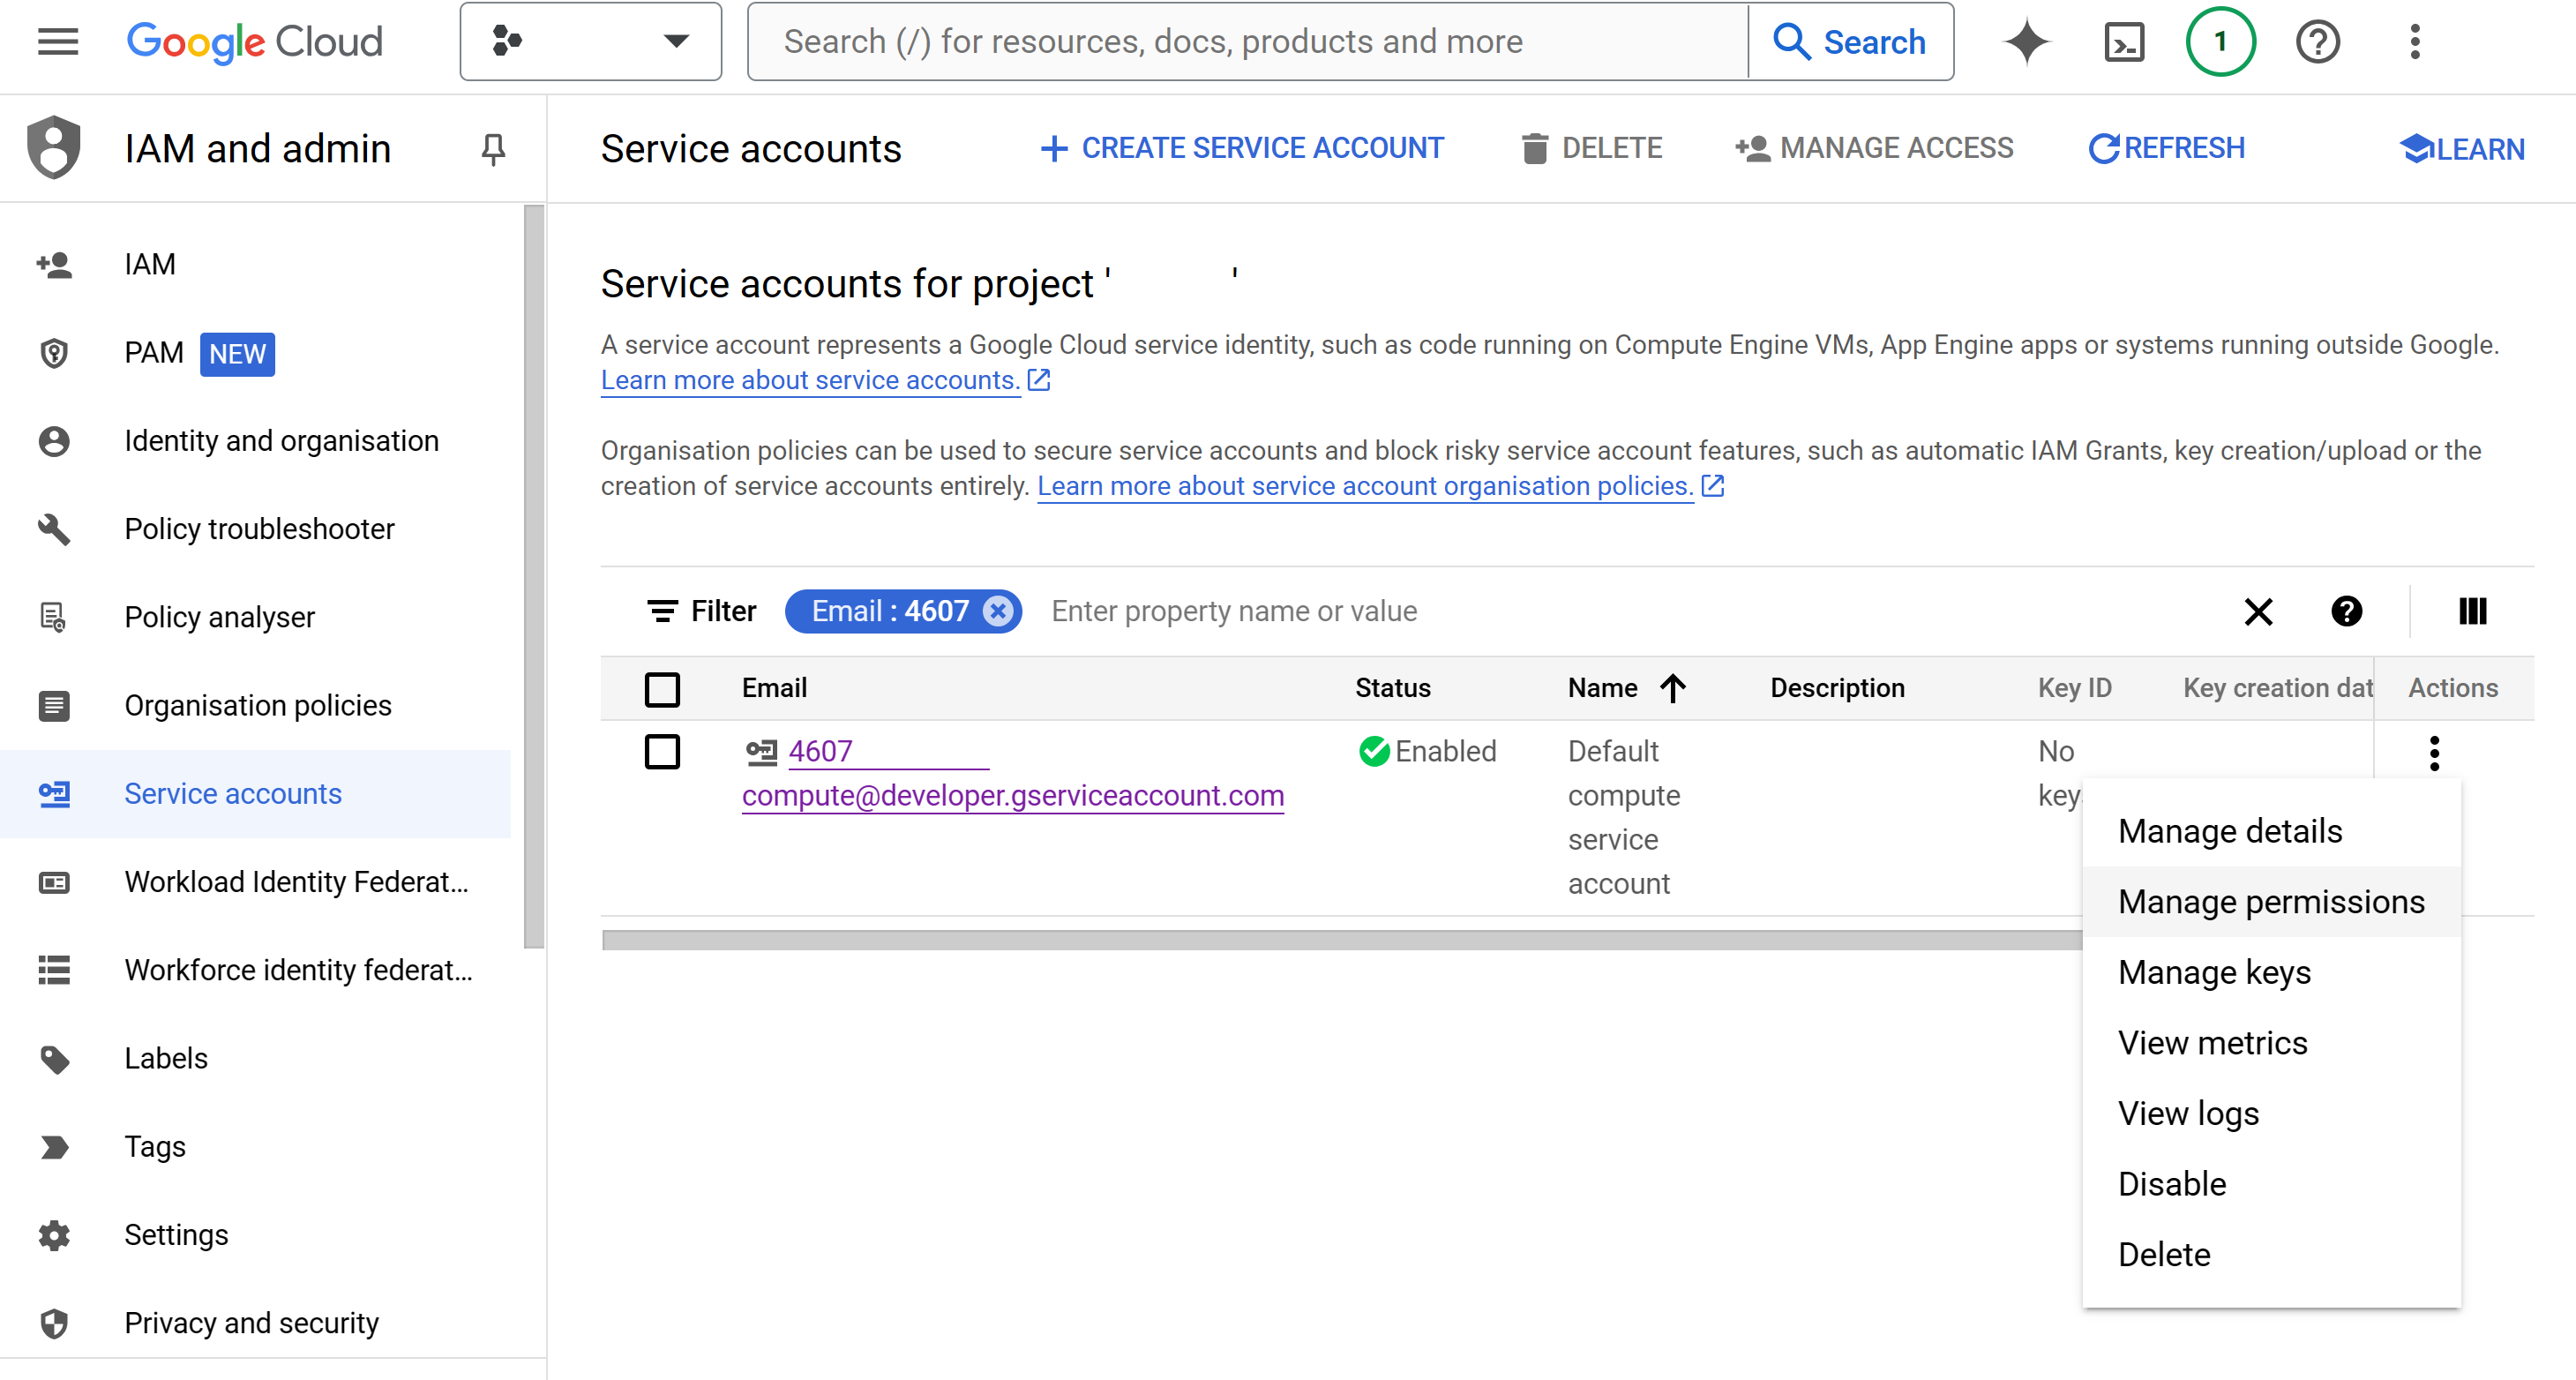
- Edit principal of "firebase-adminsdk" service account GCP Compute Service Edit Principal
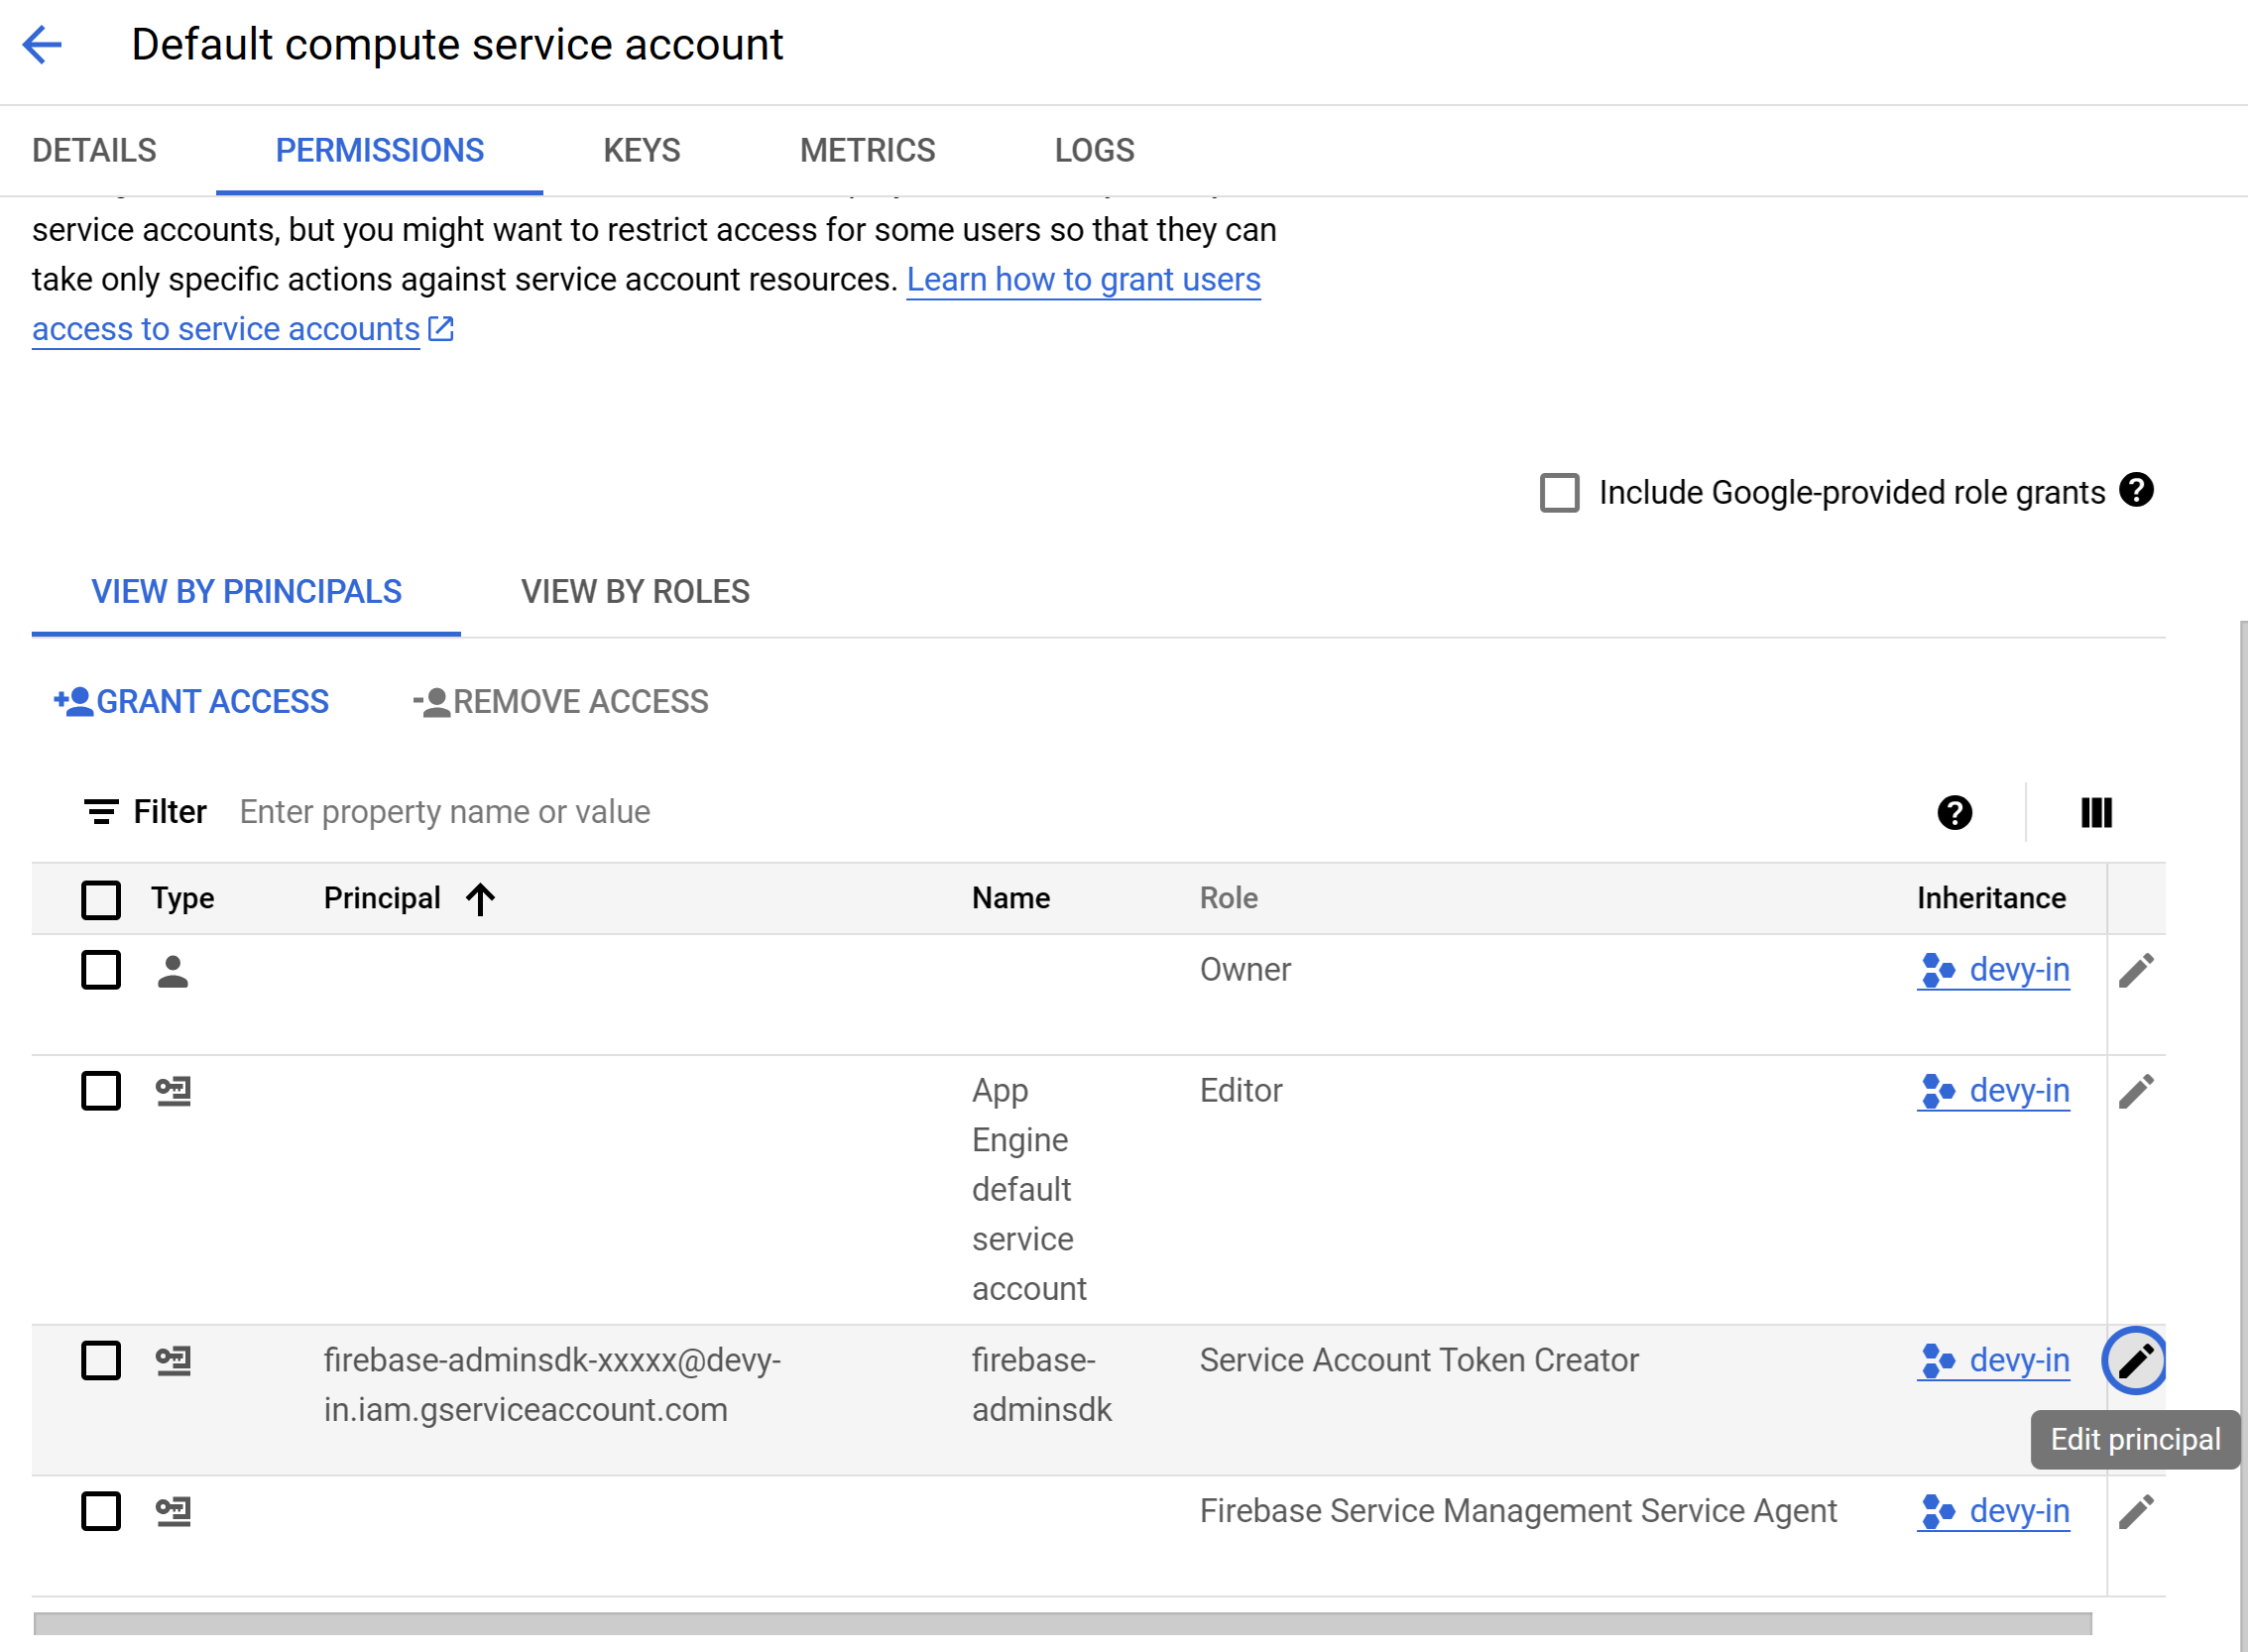
- In the Assign Role section Click on
Add RoleGCP Service Account - Add Role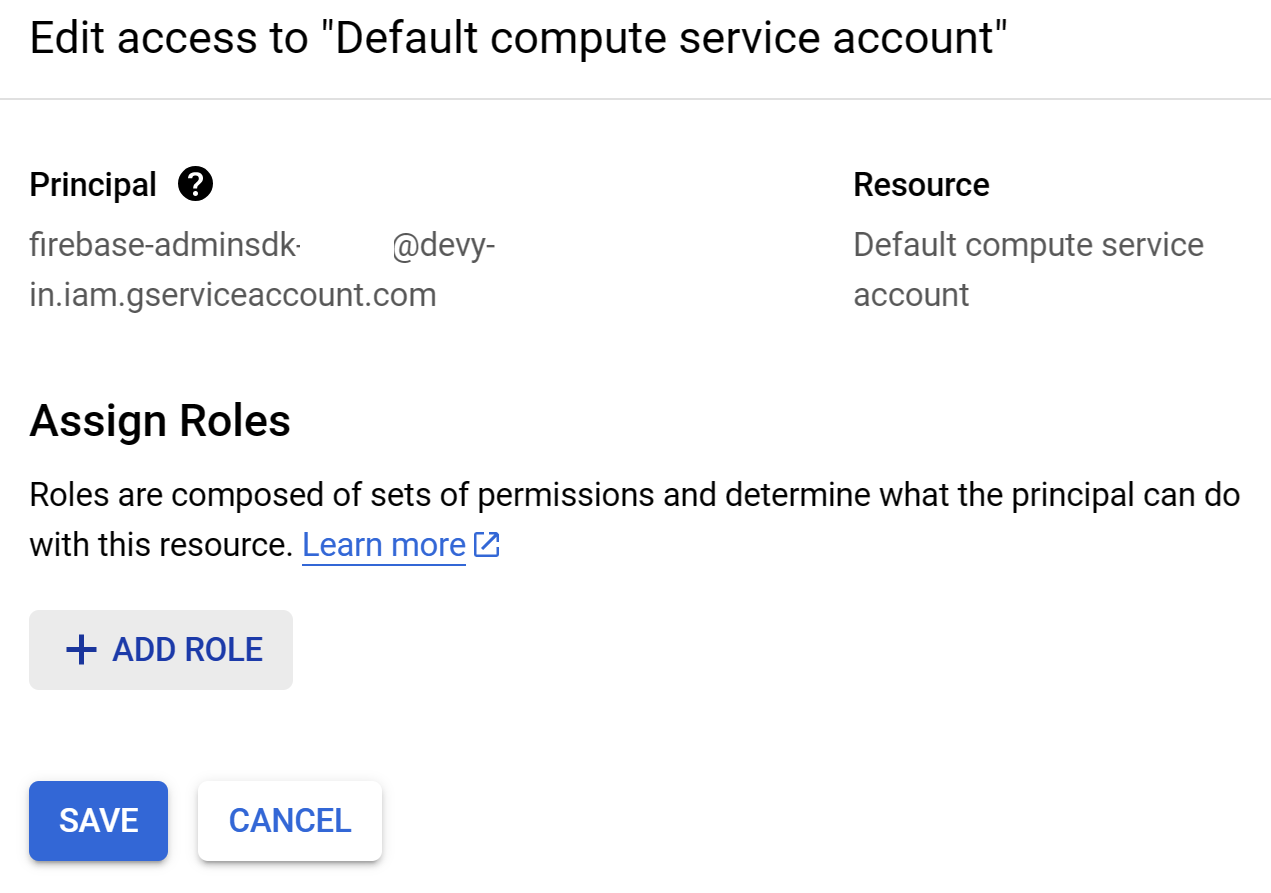
- Next search and select "Service Account User" GCP Service Account - Service Account User
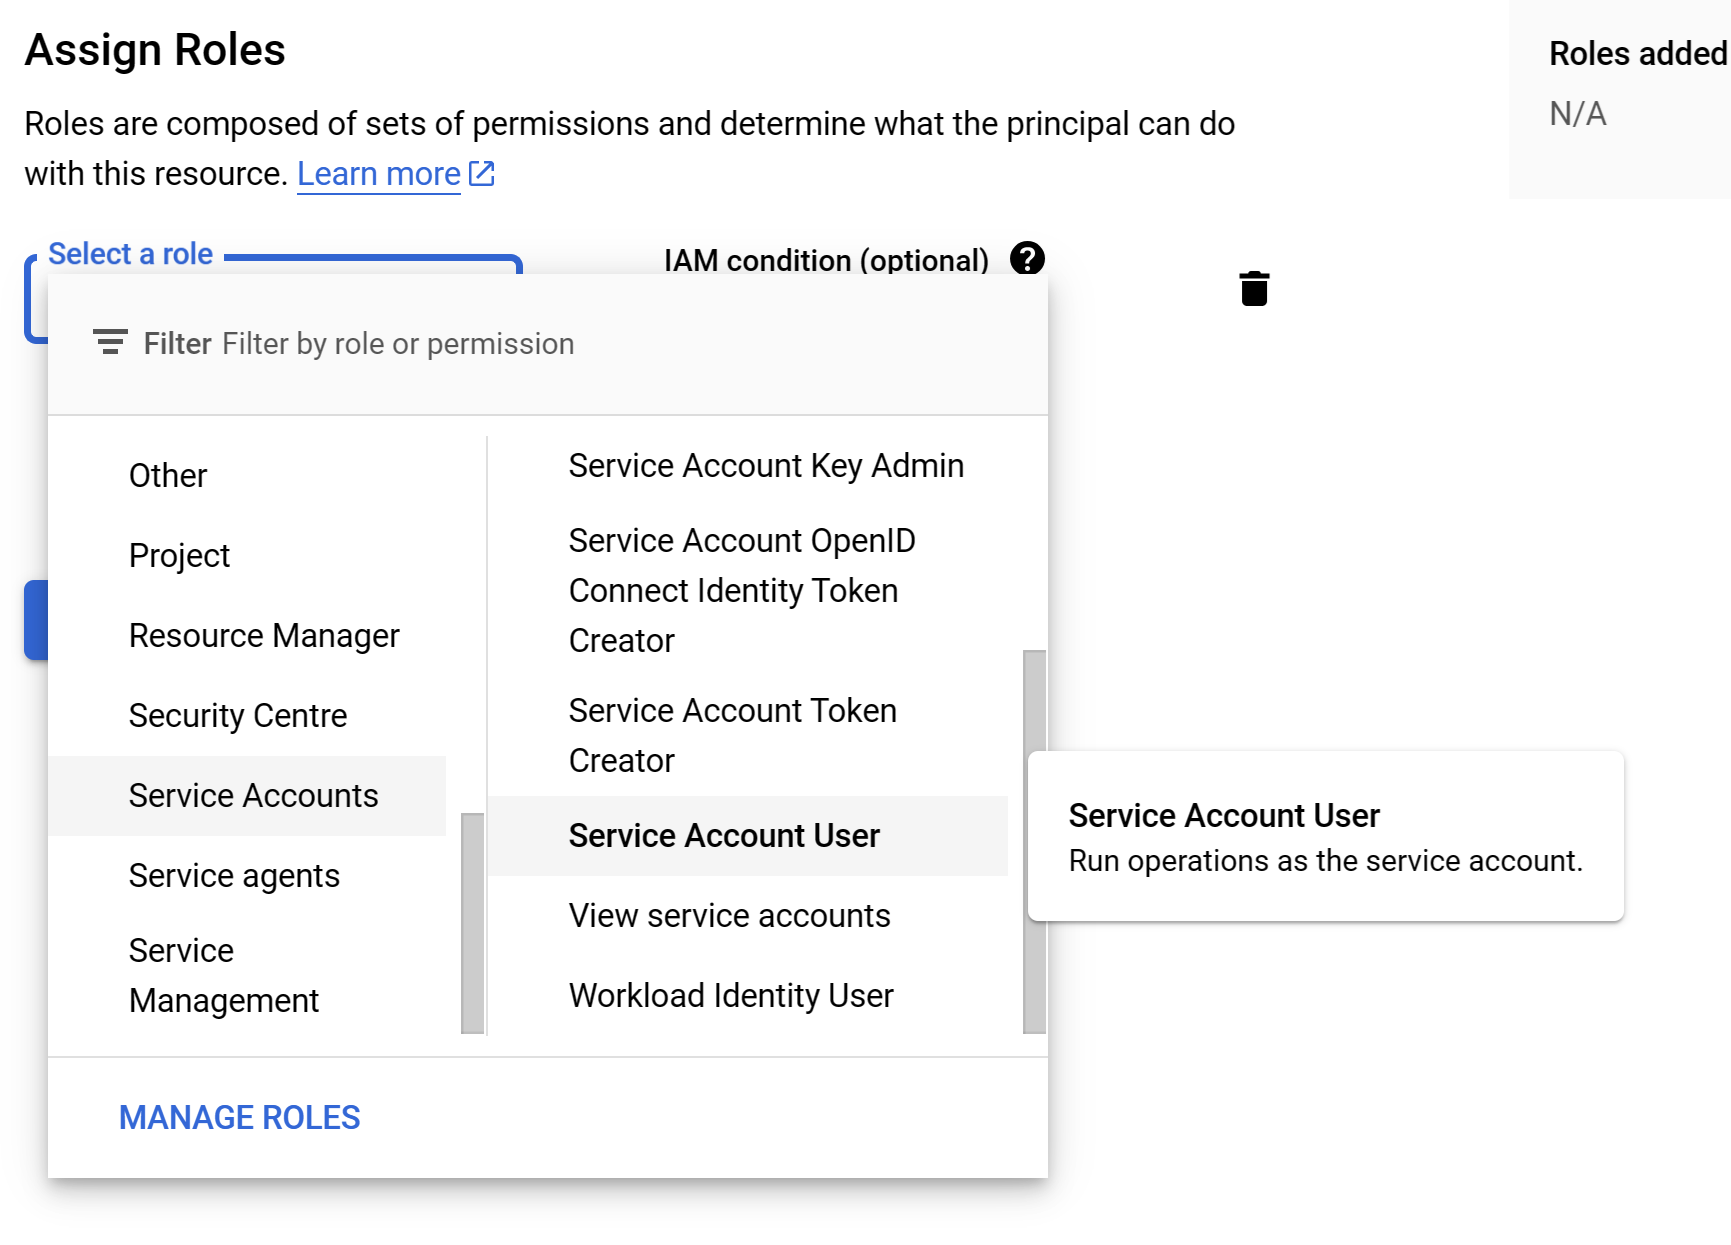
- Click on the
Savebutton.GCP Service Account - Service Account User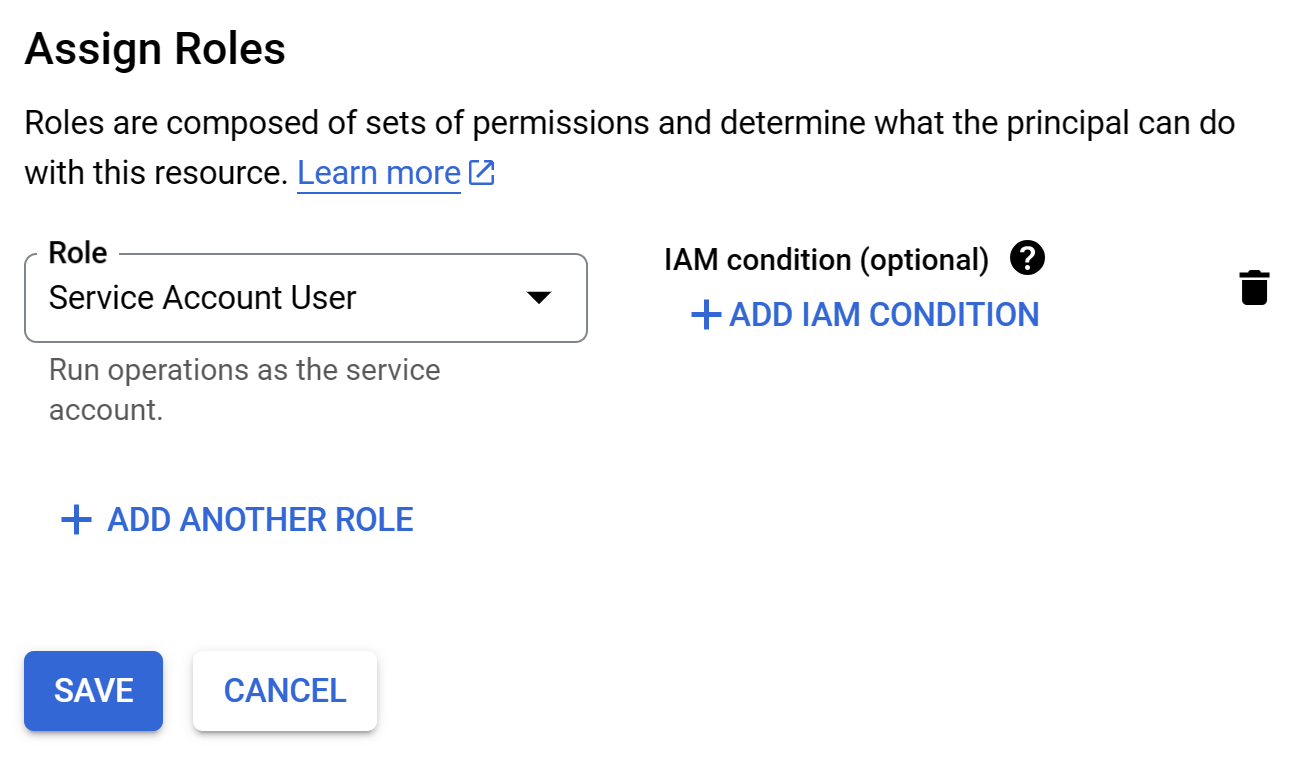
A Voila!🪄 Thats it! you won't see "HTTP Error: 403, Caller is missing permission" error when you trigger GitLab your newly created CI/CD pipeline.
